In order to be able to create interesting graphical effects for our games, we must first understand the underlying process that OpenGL uses to transform the data in our games to pixels on the screen. This process is called the “graphics pipeline” or “rendering pipeline”. There are several steps that are involved in this pipeline, some which we are able to manipulate and some we cannot. In addition, some of the steps are optional and may be skipped unless we choose to use them. The following image shows all of the steps in the graphics pipeline. The blue boxes are steps that we can manipulate via programming, and the ones with dashed outlines are optional steps.

The steps involved in the graphics pipeline. Blue boxes represent steps that are programmable, whereas yellow ones are not. Boxes that have a dotted outline are optional steps.
The first step is the vertex shader. This is a program that we write to process vertex attribute data, such as position, on the GPU. It does this on a per-vertex basis, thus only processing a single vertex at a time. The main purpose of the vertex shader is to convert vertex positions from world-space to screen-space, and to pass the resulting information to subsequent steps in the pipeline. I will discuss vertex shaders more in-depth in next week’s post on shaders.
The next group of steps concern tessellation, which is the process of subdividing patches of vertex data into smaller primitives. I wont go into much detail on these here, but important things to know about them is that they are optional, but that we can manipulate them if we need to.
The next step is the geometry shader. This is another optional shader that we are able to program if we need to. It is capable of creating new geometry on-the-fly using primitives (which were created during primitive assembly after the vertex shader) as input. This essentially allows us to transfer workload from the CPU to the GPU by letting it generate complex geometry from relatively simple input data.
The clipping step is a non-programmable step where any primitives that lie on the edge of the screen are subdivided into smaller primitives that are either completely within or outside of the screen. Subsequently, face culling takes place, where any faces that are outside of the viewing region or are hidden behind other faces are removed.
Rasterization is the process of converting primitives to sequences of fragments. Fragments contain all of the data, on a per-pixel basis, that the fragment shader needs in order to display them on-screen. This can include position, normal, and texture mapping data. Rasterization is not a programmable step of the graphics pipeline.
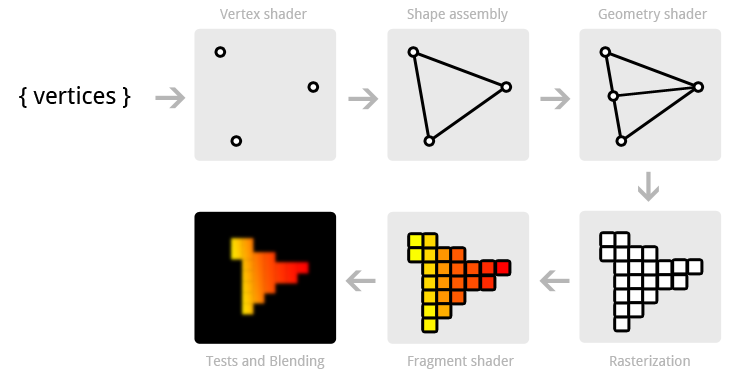
A graphical representation of several steps in the graphics pipeline.
The fragment shader is the last programmable step in the graphics pipeline. It operates on a per-pixel basis, taking fragments as input, which include all of the data specified above, and outputting the final color of the current pixel. Many operations can take place in the fragment shader, such as texture mapping and lighting calculations. I will go further into depth on fragment shaders in next week’s post on shaders.
The final step in the graphics pipeline is a series of tests and blending operations. The tests are used to cull any fragments that should not be added to the framebuffer for whatever reason. Blending is then used to blend fragments with any already existing in the framebuffer. Finally, the resulting data is written to the framebuffer.
